Exam 77-891 Office 365
2. Communicate by using Office 365 Outlook Web Application
2.1 Manage E-Mail: Creating and Using Receipts
2. Communicate by using Office 365 Outlook Web Application
2.1 Manage E-Mail: Creating and Using Receipts


Respond to a Read Receipt
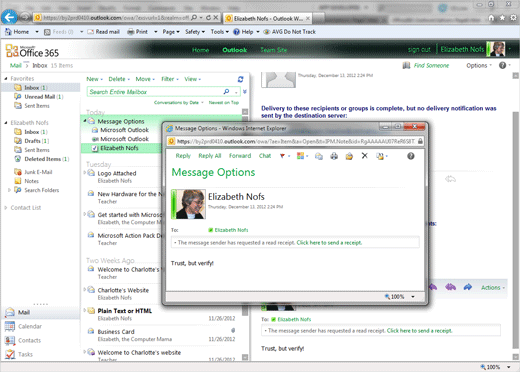
If you have been following these steps, a new message should arrive in your Inbox. In fact, there should be two E-mails: the one that you addressed to yourself, and a Delivery Receipt from the Server.
The Delivery Receipt has a little green icon. This Receipt confirms that your message was delivered. The Delivery Receipt is automatically generated by the Server-there is no button to cancel the notification.
The Read Receipt is something the Recipient can choose, or not.
4. Try It: Send a Read Receipt
Select the new message in the Inbox.
Click on Click here to send a receipt.
Keep going...
What Do You See? In the previous step, we included a Bcc Field. Did you notice that the name in the Bcc Field is hidden from the recipients after the E-mail arrives in the Inbox.
Mail->Inbox->Read Receipt


